Getting started with Akita Store
June 17, 2023
Having a proper state management is crucial for enterprise applications and user experience. If you are building a small application then you can skip a dedicated state management library and Angular will provide you with enough options to maitain app state. Recently i explored Akita a state management library for Javascript created by Salesforce. So instead of just going through documentation and understanding the concepts, i decided to create a Todo app. You can find the complete source code on my Github account. Akita lets you focus more on feature development than writing a lot of boilerplate code. First let's learn building blocks of Akita.
1 Store
In Akita, a store is just a like a database table, where you can store records for an entity. You can consider store as a place where you can keep entities to avoid having requesting same data from backend. Unlike Redux, Akita support multiple stores. We can have store for each entity.
2 Query
In Akita, a query is a class that offers you the ability to query a Akita store. Akita provides helper methods that can be used to filter entities in the store. Akita also enables to get data from different stores by joining different queries.
3 Service
A service is a class that exposes different methods that will allow the client code to make changes in the store. You can add, update, delete data in store by writing custom functions in service. Also you can connect your service class with backend API to fetch the records and load them in the store.
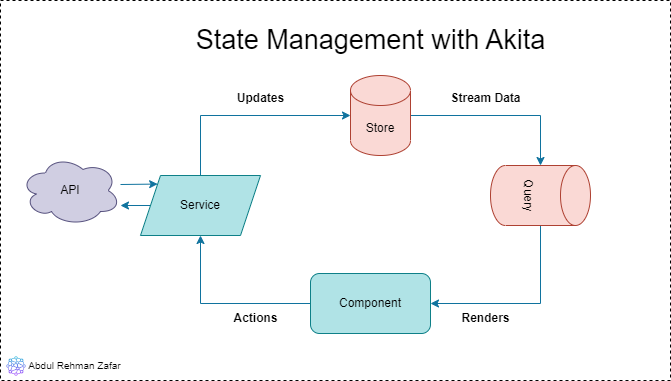
Here is a diagram that summarize above concpets.
Enough of theory let jump in to writing building the app.First create an angular app. I am currently using angualr CLI 14.
ng new todo
Install the akita library with version number 6.1.3 as this version works fine with angular 14.
ng add @datoroma/akita@6.1.3
Also downgrade the version of rxjs library as follows.
npm install rxjs@6.6.0
Also install the angular material and bootstrap to create the Todo app UI.
npm install @angular/material
npm install bootstrap
Configure the boostrap in angular.json file by adding css class in architect/build/options/styles.
"styles": ["./node_modules/bootstrap/dist/css/bootstrap.css"]
Now we are good to go. Lets add some more code
Create a folder with name state at path app/src. Add a file name todo.model.ts with following content. This will be the model of Todo.
export type Todo = {
  id: string;
  title: string;
  completed: boolean;
};

export function createTodo(title: string) {
  return {
    id: guid(),
    title,
    completed: false
  } as Todo;
}
We can also save the UI state in store as well. So Let's have a visibility filter that will allow us to filter Todo list based on the selected filter. Create a file name visibility.filter.ts as follows.
export enum VISIBILITY_FILTER {
    SHOW_COMPLETED = 'SHOW_COMPLETED',
    SHOW_ACTIVE = 'SHOW_ACTIVE',
    SHOW_ALL = 'SHOW_ALL'
}

export type TodoFilter = {
    label: string;
    value: VISIBILITY_FILTER;
};
Now create a file name todos.state.ts. This is the file that will hold the entity and any extended state that needs to be stored. The state extends the EntityState from akita with our app model Todo. We can also add more properties to the state, for example to save the state of selected filter we can properties in ui object like below.
export interface TodosState extends EntityState<Todo, string> {
    ui: {
        filter: VISIBILITY_FILTER
    };
}
Now let's create a store with file name todos.store.ts, that will be responsible to hold our data in browser. To create a store you need to provide a state, so in our case it will 'TodoState' created earlier. We can also provide an initial state as well when initializing the store so by default we are setting the filter to show all Todo's.
const initialState = {
  ui: {
    filter: VISIBILITY_FILTER.SHOW_ALL
  }
};

@Injectable({
  providedIn: 'root'
})

@StoreConfig({ name: 'todos' })
export class TodosStore extends EntityStore<TodosState> {
  constructor() {
    super(initialState);
  }
}
The next step is to add the a Query that will allow us to fetch the saved records. Create a file name todos.query.ts
@Injectable({
    providedIn: 'root'
})
export class TodosQuery extends QueryEntity<TodosState> {

    selectVisibilityFilter$ = this.select(state => state.ui.filter);
    $allTodos = this.selectAll();

    selectVisibleTodos$ = combineLatest([this.selectVisibilityFilter$,  this.selectAll()], (filter, todos) => {
        switch (filter) {
            case VISIBILITY_FILTER.SHOW_COMPLETED:
                return todos.filter(t => t.completed);
            case VISIBILITY_FILTER.SHOW_ACTIVE:
                return todos.filter(t => !t.completed);
            default:
                return todos;
        }
    });

    constructor(protected override store: TodosStore) {
        super(store);
    }
}
Final piece in the puzzle is to have a todos.service.ts file that will allow us to add, delete and update entitties in the store. This will directly interact with the store we created above.
@Injectable({
  providedIn: 'root'
})
export class TodosService {

  constructor(private todosStore: TodosStore) { }

  updateFilter(filter: VISIBILITY_FILTER) {
    this.todosStore.update({
      ui: {
        filter
      }
    });
  }

  complete(id: string) {
    this.todosStore.update(id, { completed: true });
  }

  add(title: string) {
    const todo = createTodo(title);
    this.todosStore.add(todo);
  }

  delete(id: string) {
    this.todosStore.remove(id);
  }
}
Enough of setting up the state related stuff. Now we will create a component to show list of todo's and have a dropdown that will enable filtering based on different states of the Todo.
Create a new folder **features ** in app/src. Add first component.
ng g c features/todo-list
Update the todo-list.component.ts file with following code.
export class TodoListComponent implements OnInit {

  @Output() deleteTodoEvent = new EventEmitter<string>();
  @Output() completeTodoEvent = new EventEmitter<string>();
  @Output() changeFilterEvent = new EventEmitter<VISIBILITY_FILTER>();
  todos$: Observable<Todo[]>;
  activeFilter$: Observable<VISIBILITY_FILTER>;

  displayedColumns: string[] = ['id', 'title', 'completed', 'action'];

  initialFilters: TodoFilter[] = [
    { label: 'All', value: VISIBILITY_FILTER.SHOW_ALL },
    { label: 'Completed', value: VISIBILITY_FILTER.SHOW_COMPLETED },
    { label: 'Active', value: VISIBILITY_FILTER.SHOW_ACTIVE }
  ];

  constructor(private todosQuery: TodosQuery) { }

  ngOnInit(): void {
    this.todos$ = this.todosQuery.selectVisibleTodos$;
    this.activeFilter$ = this.todosQuery.selectVisibilityFilter$;
  }

  deleteTodo(todo: Todo) {
    this.deleteTodoEvent.emit(todo.id);
  }

  completeTodo(todo: Todo) {
    this.completeTodoEvent.emit(todo.id);
  }

  changeFilter(event: any) {
    this.changeFilterEvent.emit(event.value);
  }
Update the todo-list.component.html to include the angular material table
<div class="row">
<mat-form-field>
    <mat-label>Filter</mat-label>
    <mat-select [(ngModel)]="activeFilter$" name="filter" (selectionChange)="changeFilter($event)">
      <mat-option *ngFor="let todoFilter of initialFilters" [value]="todoFilter.value">
        {{todoFilter.label}}
      </mat-option>
    </mat-select>
  </mat-form-field>

<h1>TODOS HISTORY</h1>

<table mat-table [dataSource]="todos$" class="mat-elevation-z8">

    <!-- Id -->
    <ng-container matColumnDef="id">
        <th mat-header-cell *matHeaderCellDef> Id </th>
        <td mat-cell *matCellDef="let element"> {{element.id}} </td>
    </ng-container>

    <!-- Title Column -->
    <ng-container matColumnDef="title">
        <th mat-header-cell *matHeaderCellDef> Title </th>
        <td mat-cell *matCellDef="let element"> {{element.title}} </td>
    </ng-container>

     <!-- Completed Column -->
     <ng-container matColumnDef="completed">
        <th mat-header-cell *matHeaderCellDef> Is Completed </th>
        <td mat-cell *matCellDef="let element">
            <mat-checkbox [checked]="element.completed"  (change)="completeTodo(element)">Completed</mat-checkbox>
        </td>
    </ng-container>

    <ng-container matColumnDef="action">
        <th mat-header-cell *matHeaderCellDef> Action </th>
        <td mat-cell *matCellDef="let element">
            <button mat-icon-button color="warn" aria-label="Delete" (click)="deleteTodo(element)">
                <mat-icon>delete</mat-icon>
            </button>
        </td>
    </ng-container>


    <tr mat-header-row *matHeaderRowDef="displayedColumns"></tr>
    <tr mat-row *matRowDef="let row; columns: displayedColumns;"></tr>
</table>
</div>
Finally, add the todo-page Component that will allow us to add the todo, receive the event of update and delete from the todo-list component.
ng g c features/todo-page
update the todo-page.component.ts file with below code.
export class TodoPageComponent implements OnInit {

  add(input: HTMLInputElement) {
    this.todosService.add(input.value);
    input.value = '';
  }

  deleteTodo(id: string) {
    debugger;
    this.todosService.delete(id);
  }
  completeTodo(id: string) {
    this.todosService.complete(id);
  }

  updateFilter(filter: VISIBILITY_FILTER){
    this.todosService.updateFilter(filter);
  }
}
And finally update the todo-page.component.html like below.
<div class="row">

    <mat-form-field class="">
      <mat-label>Add A Todo</mat-label>
      <input matInput placeholder="Todo" #input (keydown.enter)="add(input)">
      <mat-icon matSuffix>alarm</mat-icon>
    </mat-form-field>
  </div>

  <app-todo-list
  (deleteTodoEvent)="deleteTodo($event)"
  (completeTodoEvent)="completeTodo($event)"
  (changeFilterEvent)="updateFilter($event)"
  ></app-todo-list>
Summary
That's it, you have an angular app with akita state management. To summarize, Akita makes state management a lot easier and it has less boilerplate than something like NgRx